Writing a Little Man Computing Interpreter in Typescript
Introduction
Why did I make this?
So, recently I had to learn Little Man Computing (LMC) as an aspect of taking my A-Level qualification for Computer Science and throughout learning it we were using Peter Higginson's Little Man Computer - CPU Simulator and it raised the personal question:
"What if I made my own?"
which I decided to do today - and finished.
How did I make it?
In order to make this project, I outlined the initial requirements of the project, i.e., the target platform, and what I wanted to accomplish.
For the first question, I had already made up my mind. I wanted it to be possible to run in both a web browser and locally on the computer. This would mean that a majority of modern devices with a browser with JavaScript would be able to run it. This led to me to choosing Node.js with Typescript due to prior experience (with both the language and frameworks such as React which would make producing a website for it easier in the future) and the fact that it can be run locally and using in the browser as a dependency when built.
For the second question, I wanted to accomplish being able to simulate executing the assembly. I broke this down into two core components:
- Parser - parses the assembly into abstract instructions
- Interpreter - interprets and simulates the instructions, producing the result
In order for this, I created a set of commons containing shared code between the two, i.e., Opcodes.
Components
Parser
The concept of the parser is simple:
- Go through the file, line by line
- Tokenise the line by splitting by spaces & tabs
- Handle the tokens (max. 3 tokens)
- Tokenisation
- Substitution of labels
- Validation (throughout)
Tokenisation
At face-value, it seems pretty easy to produce the parser, but it has the challenge of handling the four possible sequences of tokens:
<opcode><label> <opcode><opcode> <operand><label> <opcode> <operand>
with the challenge coming into practice when handling two tokens. I chose to tackle this by identifying the position of the opcode and then using that to identify what sequence it was:
If it was the first token, it would be <opcode> <operand>, otherwise it would be <label> <opcode>.
Substitution
In order to perform substitution, I decided to:
- Tokenise and produce the instructions first as 'intermediary' instructions (accepted string in addition to number) - labels would be mapped upon discovery
- Iterate through the intermediary instructions and re-map string operands
At the same time, this enabled me to easily validate the labels as they would be strings without mapped values.
instructions.forEach((instruction) => {
  if (
    instruction.operand !== undefined &&
    typeof instruction.operand === "string"
  ) { // Handle label substitution
    const index = result.labels.get(instruction.operand);
    if (index !== undefined) {
      result.instructions.push({
        opcode: instruction.opcode,
        operand: index,
      });
    } else {
      logger.error(`Label ${instruction.operand} not found`);
      result.instructions.push({
        opcode: Opcode.ERR,
      });
    }
  } else {
    result.instructions.push(instruction as Instruction);
  }
});
Validation
Having implemented tokenisation, I implemented several steps of validation to produce early on errors at parse-time. The validation checks composed of:
- Invalid opcode checks; must have a valid identifier in
Opcode - Invalid label checks; would have to pass a regex and not be a valid identifier in
Opcode - Invalid operand checks; must be either a number (index, untested) or label
- Missing operand checks
All of these checks were be integrated throughout the parser, which does have the downside of making it a slight bit harder to read but the benefit of ensuring the user-provided assembly is entirely readable and interpretable*.
* except for untested references by index
Features
Afterwards, I also decided to implement two small but neat features:
- Split Lines: optionally split lines using a pre-set sequence of characters, i.e.,
;- seen in example - Comments: Optionally ignore content past pre-set sequence of characters for each line, i.e.,
//
Both of these were extremely simple to implement as they could be injected at read-time.
let lines = this.options.program.split("\n");
if (this.options.splitLines.enabled) {
  for (let i = 0; i < lines.length; i++) {
    const content = lines[i].split(this.options.splitLines.sequence);
    if (content.length > 1) {
      lines.splice(i, 1, ...content);
    }
  }
}
if (this.options.comments.enabled) {
  lines = lines.map((line) => line.split(this.options.comments.sequence)[0]);
}
Interpreter
The concept of interpreter is also simple as per the nature of LMC:
- Initialisation - to make the code execution more faithful to a genuine machine
- Loading both instructions and data in memory
- Instructions would be encoded using bitwise operators to store both the opcode and operand
- Automatically append a
HLT*
- Follow the fetch-decode-execute (FDE) cycle
- Fetches the instruction from memory
- Increments the program counter
- Decodes the instruction
- Executes the instruction
- Repeat until the end of the program is reached
*inverse effect, less faithful
Initialisation
Initialisation of the interpreter is very bare bones in other to be relatively faithful.
Upon creation, the memory would be stores as a number list composed of 0s to fill the given size. Then at the start of run, the program would be inserted into the memory whilst substituting data opcodes for raw data which would force them to be stored at the end or skipped over by using branching.
this.options.program.forEach((instruction, index) => {
  if (instruction.opcode === Opcode.DAT) {
    this.memory[index] = instruction.operand as number;
  } else {
    this.memory[index] = this.encode(instruction);
  }
});
To store the instruction, it is encoded, being composed of the opcode shifted by 8 bits and the operand (if available) stored normally.
private encode(instruction: Instruction) {
  return (instruction.opcode << 8) | (instruction.operand || 0);
}
In order to decode, it is reversed, using a mask to prevent collision.
private decode(rawInstruction: number): Instruction {
  return {
    opcode: (rawInstruction & 0xff00) >> 8,
    operand: rawInstruction & 0x00ff,
  };
}
Fetch-Decode-Execute Cycle
The fetch-decode-execute cycle then iterates through the instructions in memory, using the program counter as a pointer and instruction & address registers to store current instruction data.
This is performed in a step() method, repeatedly called within run() until it return false, indicating that the program has halted.
And, just as per the name instructs, it acts in a 1-to-1 FDE cycle.
Fetch
The instruction (in its raw format as a number) is fetched from memory, using the program counter as a pointer.
const rawInstruction = this.memory[this.programCounter];
if (!rawInstruction) {
  return false;
}
The location is validated to prevent any potential bugs.
Decode
The instruction is then decoded, with instruction information being loaded into the appropriate registers.
const instruction = this.decode(rawInstruction);

this.instructionRegister = instruction.opcode;
if (instruction.operand !== undefined) {
  this.addressRegister = instruction.operand;
}
Refer to earlier to cover encoding/decoding.
Execute
The appropriate logic then executed the the respective instruction, using a switch statement to decide, with the program counter being updated at the end.
Features
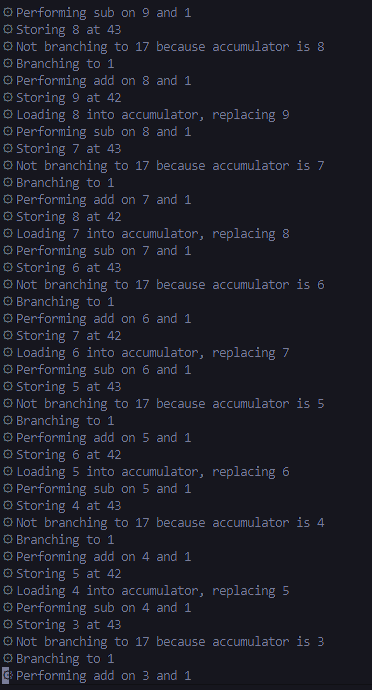
Additionally, the interpreter has the feature of a clear verbose logging through events. Each instruction performed is detailed in words (if enabled), alongside other useful information being provided.
To meet my want for it to be potentially used in a website in the future, and adaptive to people's needs, I to not implement any features such as input or output, rather using events so it can be adapted to the wanted environments.
Conclusion
The project definitely still needs more work and testing, but is in a very strong state and serves as a very neat and quick project. I was generally pretty happy with the outcome despite being somewhat slow (interpreter), primarily due to added bloat such as logging.
Change since writing:
- I have made automatically appended
HLTinstruction optional.- I have made a web app for the interpreter, available here. The source is available here.
Writing notes:
- The blog is very much an overview of the project, not diving as deep as I intended into it's functionality. It seems much more like a story.
- ← Previous
Welcome to My Blog! - Next →
Hosting my School Notes for Free